The kids cousins have recently put in a vege garden. So we thought we would send them some seeds to plant in it. Most of the seeds we have collected from our own garden, and we also shared some seeds that we recently bought commercial packets of.
Things you will need:
Seeds (we had dwarf sunflowers, leek, perpetual spinach/swiss chard, silverbeet (bright lights), celery, chives, carrots (harlequin) and radishes (Easter egg mix). Plain A4 paper, which we cut down to a square Colouring pens/pencils/crayons
Instructions:
We made the seed packets according to these you tube instructions.
What the kids can do:
The kids sometimes help me collect seeds in the garden. It is a great opportunity to learn about different plants.
Miss 6 has been practicing her origami lately so could help with the seed packets. I wrote the seed names and planting times on the packets and Miss 6 did a lovely job of illustrating the plants on the other side. Mr 2 drew his own pictures on other paper while we did this.
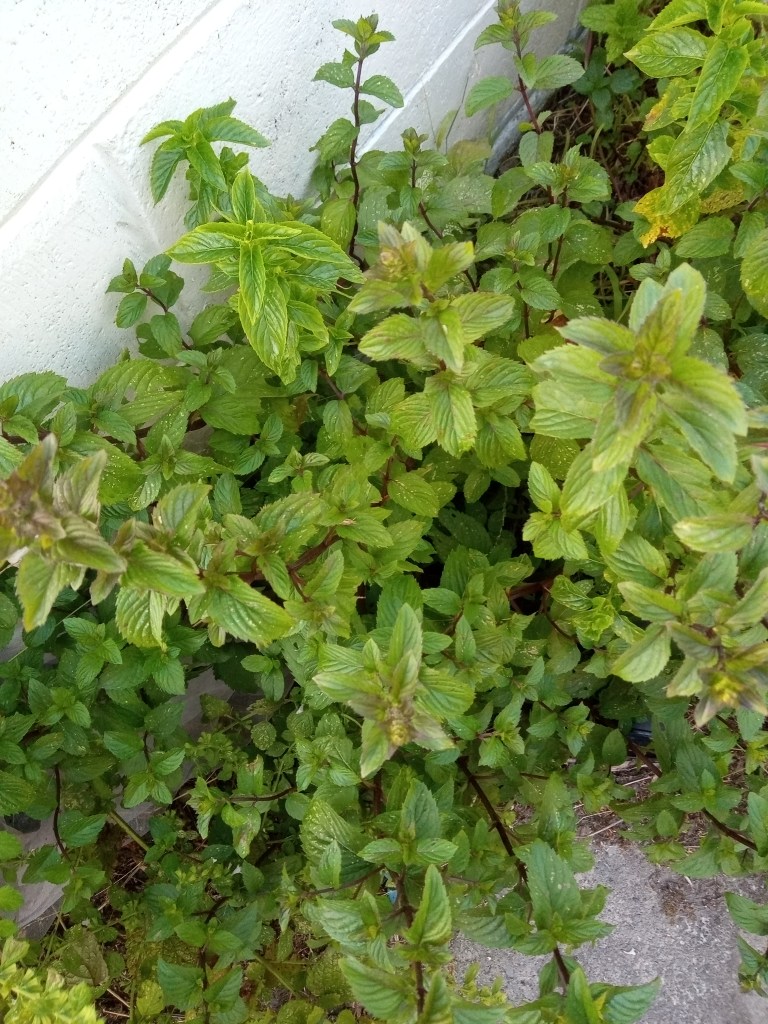
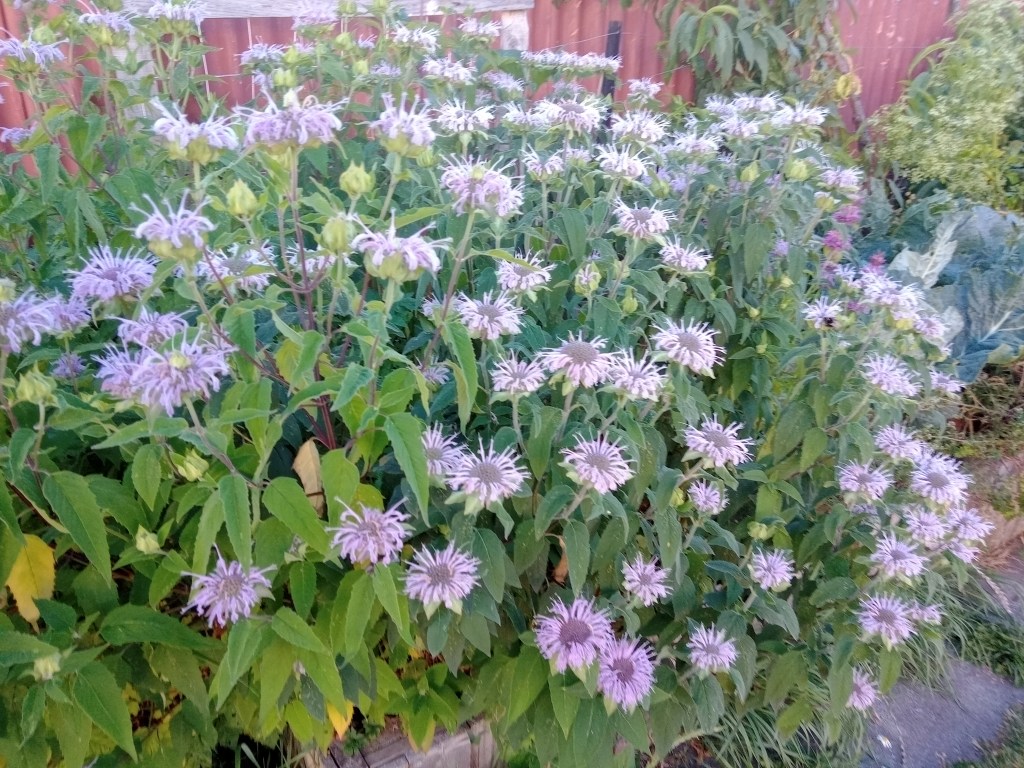
As you may know I have a bit of a penchant for obscure herbs. I have been looking for a herb bread recipe and tried these two recipes today, which I modified from these recipes: herb swirl bread and bee balm bread. We used Mint Basil (a mint variety that that has a basil like flavor) for the first loaf and bee balm bergamot for the second loaf, both from our garden
Ingredients:
Mint Basil Swirl Bread
1 1/4 cups of warm water 1 pack Edmonds Instant Dry Yeast 1 teaspoon white sugar 3 cups plain white flower pinch of salt 1 cup of fresh mint basil leaves 4 cloves of garlic generous sprinkiing of MasterFoods Garlic and Herb Salt 1/3 cup of olive oil
Bee Balm Bread
1 1/2 cups water 2 Tablespoons honey 1 pack Edmonds Instant Dry Yeast 1 cup bee balm bergamot leaves and petals 4 1/3 cups plain white flour pinch of salt 15 grams melted butter
Mint basil in our garden
Instructions:
Combine warm water, yeast and sugar or honey in a bowl and leave for 5 minutes until yeast becomes foamy.
Put flour, salt and bee balm bergamot leaves and petals if relevant in a bowl and make a well in the middle. Add the yeast mixture and melted butter if relevant and combine until the dough comes together. We do this in a food processor with a dough attachment, but you can also do it in a bowl or a bread machine.
Kneed the dough for about 15 minutes. We do this by hand, but you could also do with a bread machine if you have one.
Cover the dough and leave in a warm spot to rise for about 1 hour or until dough doubles in size.
Mint Basil Swirl Bread:
Place mint basil, garlic, garlic and herb salt, and olive oil in a food processor and blend together. Preheat the oven to 220°C (428°F).
Roll the dough out with a rolling pin until it is about 30-40cm around. Spread the mint basil mixture over the bread. Roll up the bread with the mint basil mixture inside. Brush the outside of the bread with some of the remaining mint basil mixture. Leave the bread for another 30 minutes to rise futher. Preheat the oven to 220°C (428°F).
Bake at 220°C (428°F) for 10 minutes, turn the oven down to 180°C (356°F) and bake for a further 20 minutes. Allow bread to cool and then enjoy.
Bee Balm Bread:
Preheat the oven to 190°C (374°F). Precut the bread into 12 pieces. Bake the bread to 40 minutes.
Bee balm bergamot in our garden
What the kids can do:
Hand washing: Don’t forget to get the kids (and grownups too of course) to wash their hands before you start. Little hands always seem to end up touching everything, including the ingredients. This is extra important given the current Covid-19 situation. For good 20 second hand wash, have them sing “happy birthday to me” twice.
Mixing the ingredients: My daughter likes to help using the food processor to mix all the ingredients. Bear in mind that little hands can fit down the shoot of the food processor, so always supervise this step. The advantage of using the food processor for combing the bread ingredients is that it minimises the mess, at least until you need to kneed the bread.
Kneeding: It is likely the kids won’t be keen to kneed the bread for the whole 15 minutes required. But you can give them part of the bread to kneed, at least until they lose interest.
The great thing about these kits is that you can use the recipes to make more, once you know what you are doing.
What the kids can do:
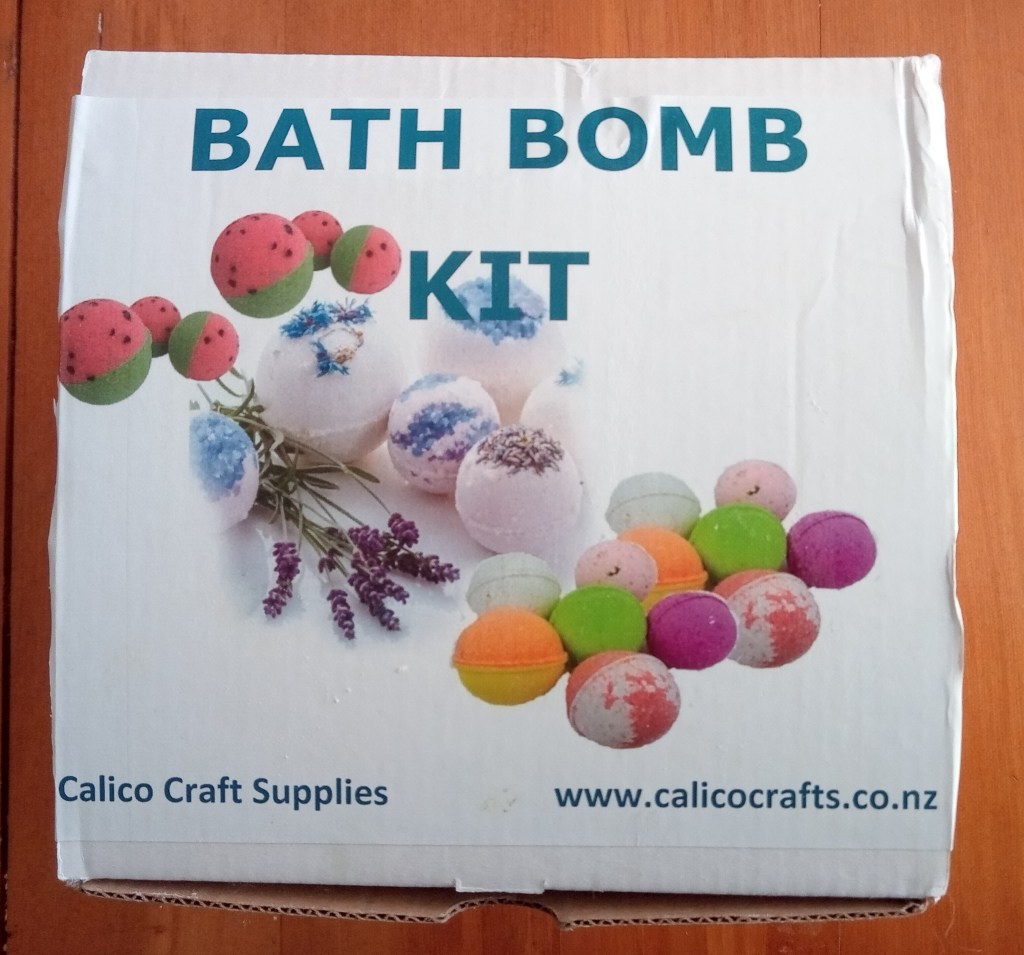
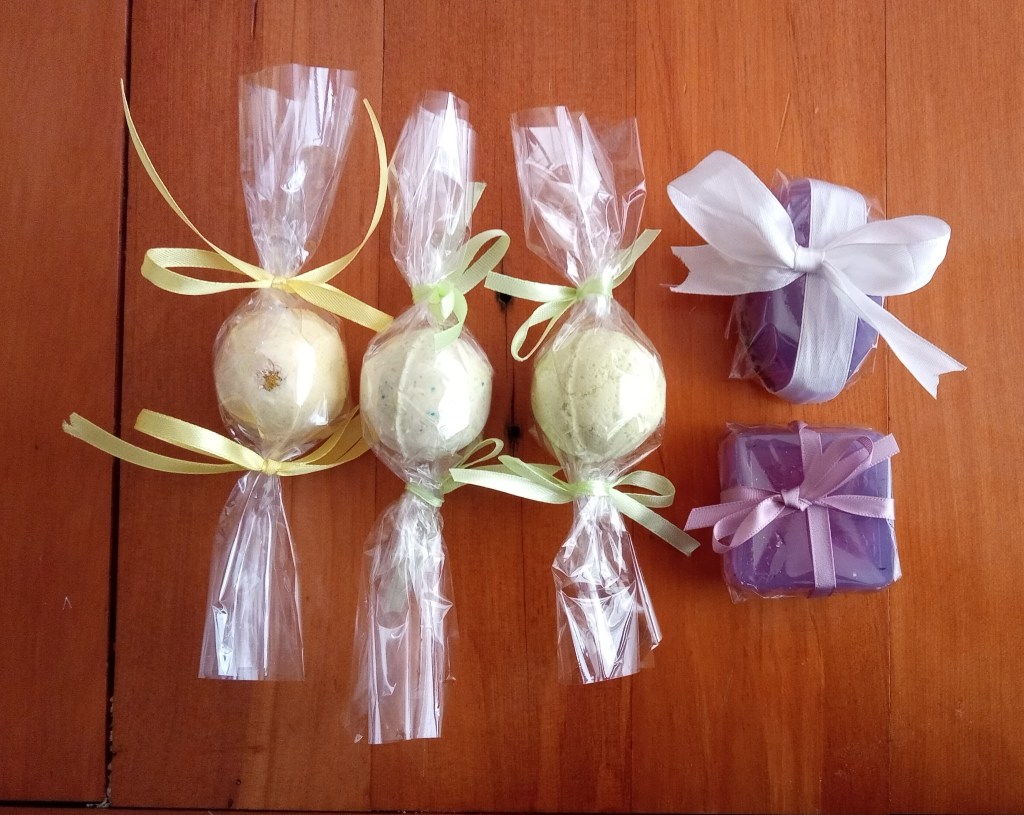
The bath bomb kit is super easy to use, just combine the dry and wet ingredients. Kids can do most of this themselves, though might need help with the measuring. Kids can help choose the scent and colour to personalise the bath bombs. We also included some dried flowers (feverfew) for decoration.
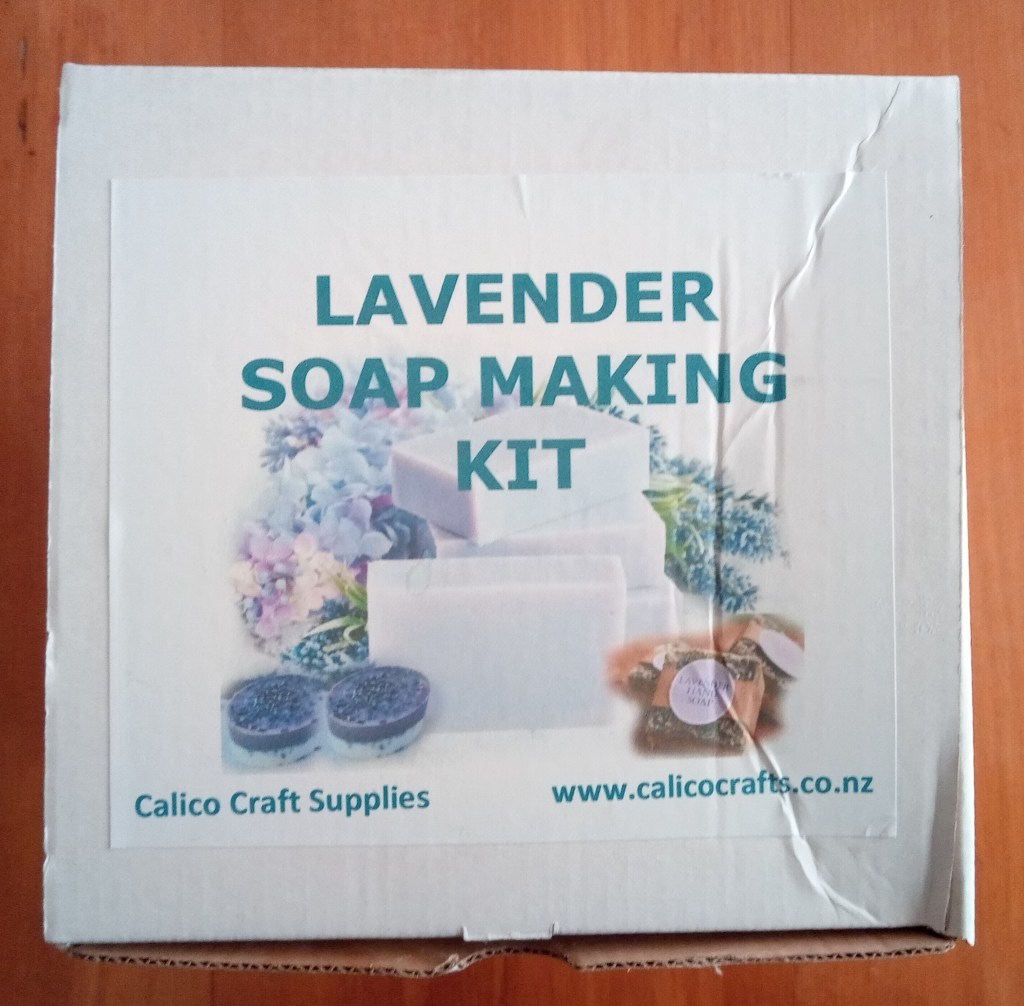
The soap kit is a melt and pour soap kit so avoids having to use any lye (which is dangerous, and I would not recommend using with children). You can buy more soap base separately if you want to make more soap. While adult help is required to melt the soap base in the microwave, this can be allowed to cool to a safe temperature before kits add other ingredients and stir them in. I also helped with the pouring (mainly to avoid too much mess) but bigger kids could handle this.
Tie dye is apparently back in again. So we thought we would make some of our own.
Things you will need:
Plastic table cloth Assorted white t-shirts, pre-washed Rubber bands Gloves Various dye colours – we bought both of these kits from K-mart which gave us 10 colours Zip lock bags or plastic wrap White vinegar Bucket
Instructions:
We followed the instructions in the K-mart kit. This meant we dyed dry T-shirts rather than damp ones as per the videos below, which use a Tulip dyes instead.
Cover your work surface in a plastic table cloth.
Take the T-shirts and fold, twist or scrunch to achieve the desired pattern (see videos below). Secure with rubber bands.
Fill the dye bottle up with water up to the marked line. Replace the cap securely and shake until dye is completely dissolved.
Wearing gloves, squirt the various dyes onto your T-shirt in the combination you desire. The more dye you use the less white space you will have on your finished T-shirt. Once finished, cover your dyed T-shirt in plastic wrap or into a zip lock bag. Wait 24 hours.
After 24 hours. Take a bucket and half fill with white vinegar, then top up with water. Remove you T-shirt from the plastic, remove the rubber bands and see how the tie dye turned out. Submerge in white vinegar solution for 30 minutes to help the fabric retain the dye.
Wash the T-shirts separate from other clothes in the washing machine.
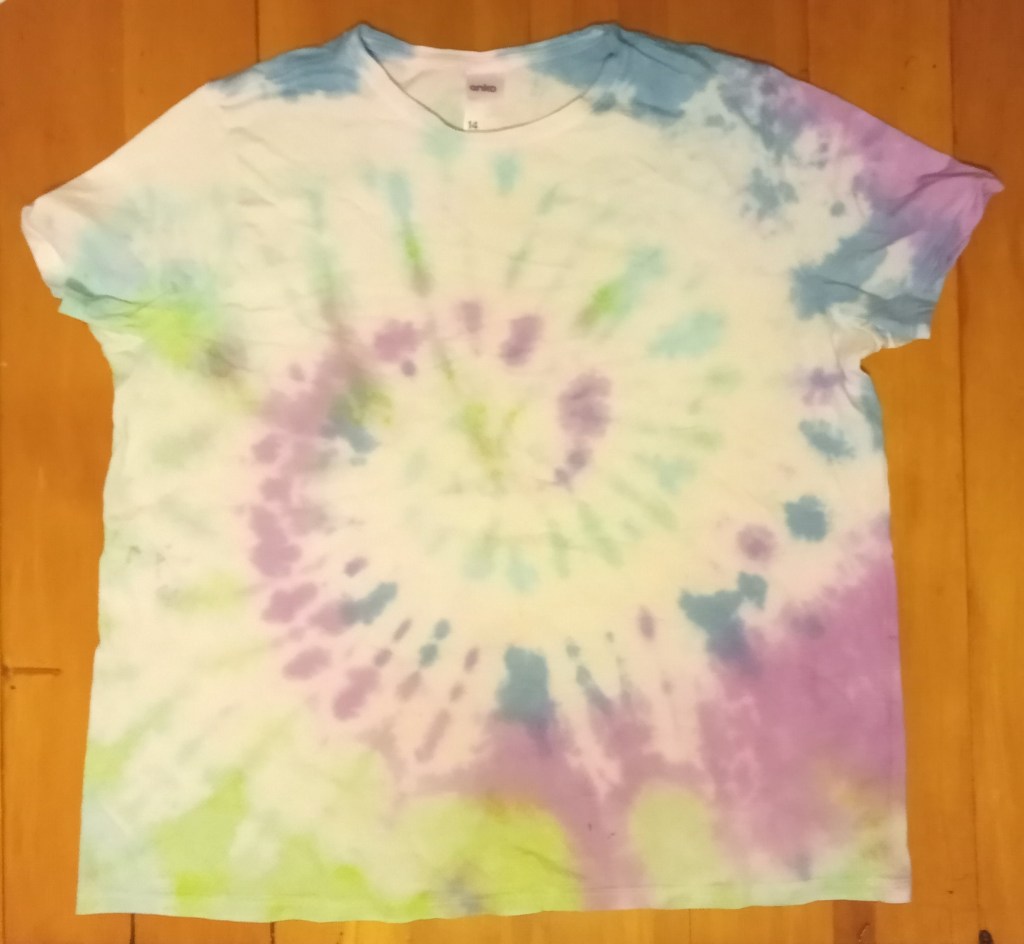
Spiral tie dye:
Mummy’s spiral tie dye T-shirt
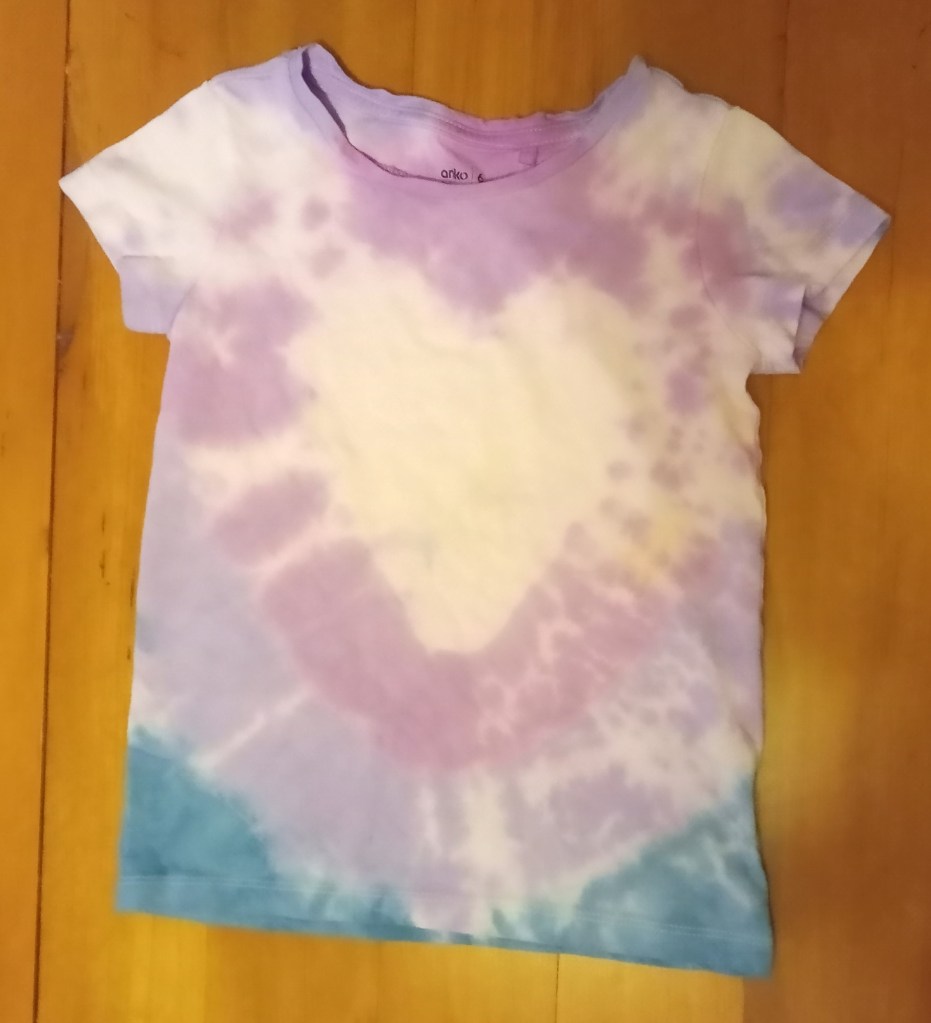
Heart tie dye:
Miss 6’s heart tie dye T-shirt
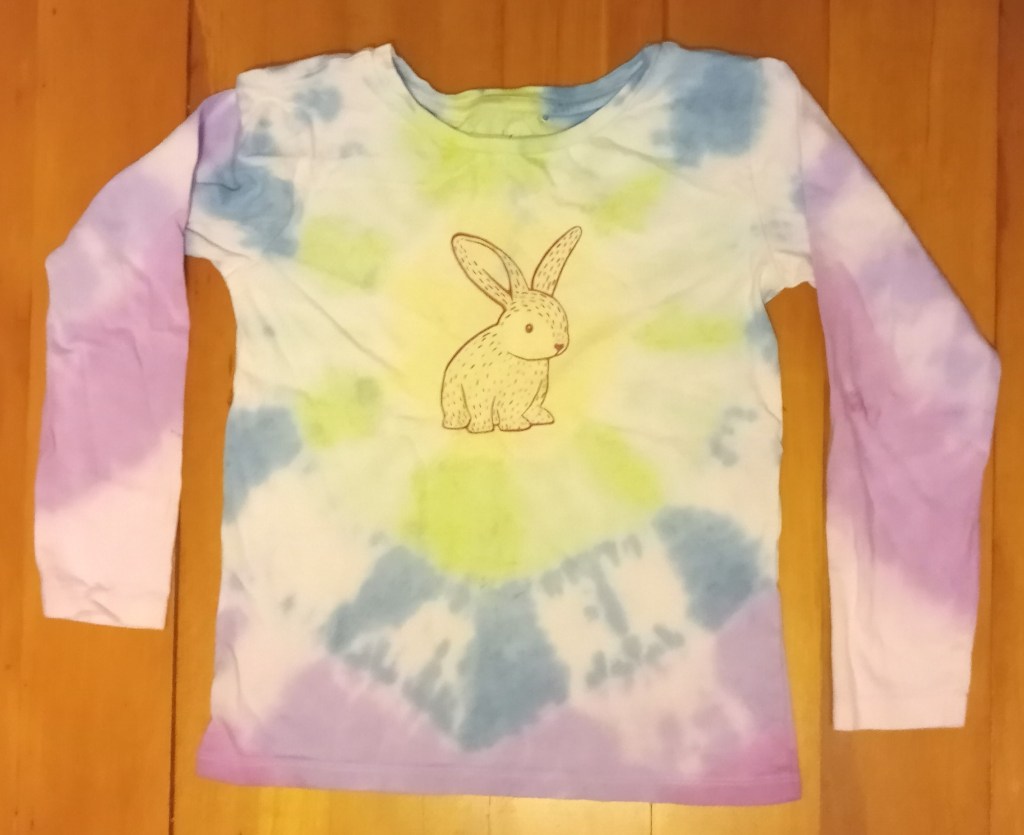
Bulls eye tie dye:
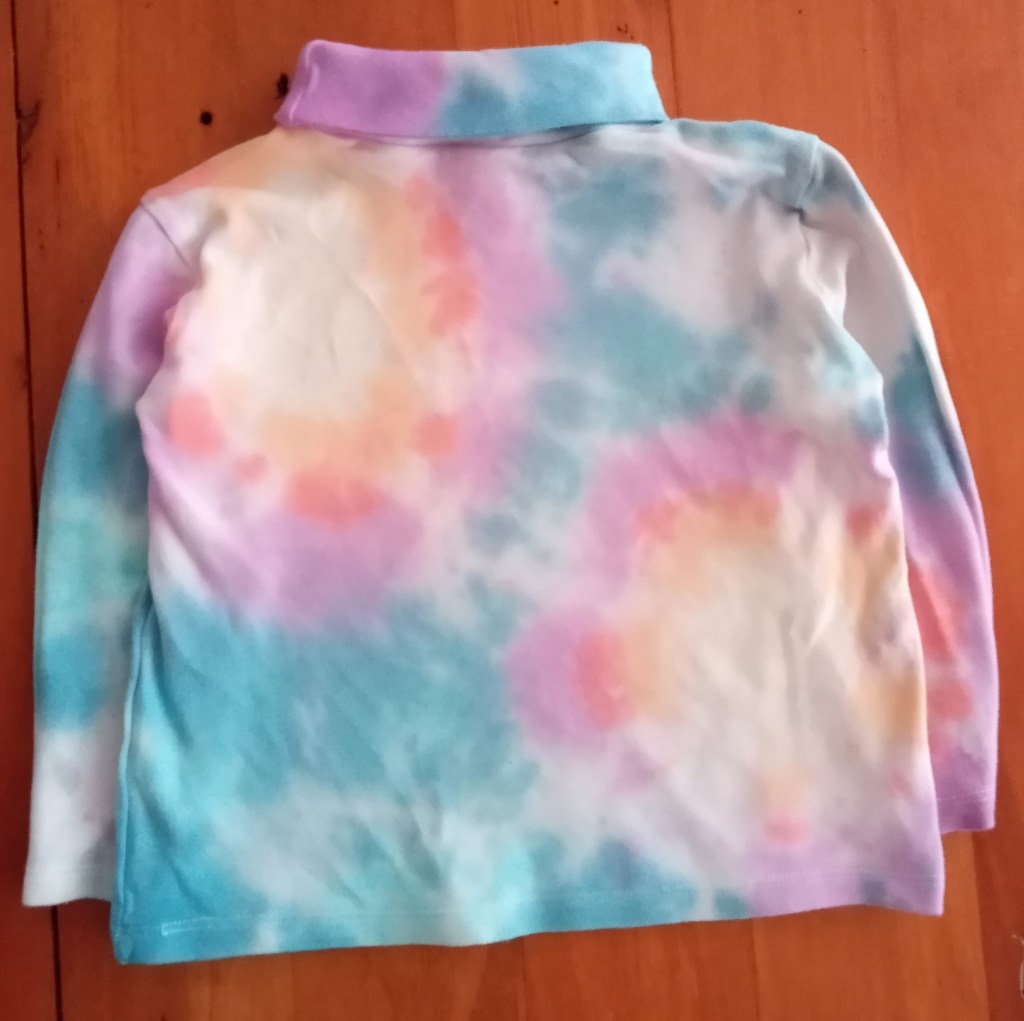
Miss 6’s bullseye bunny T-shirtMr 21 month’s bulls eye skivvy
Stripes:
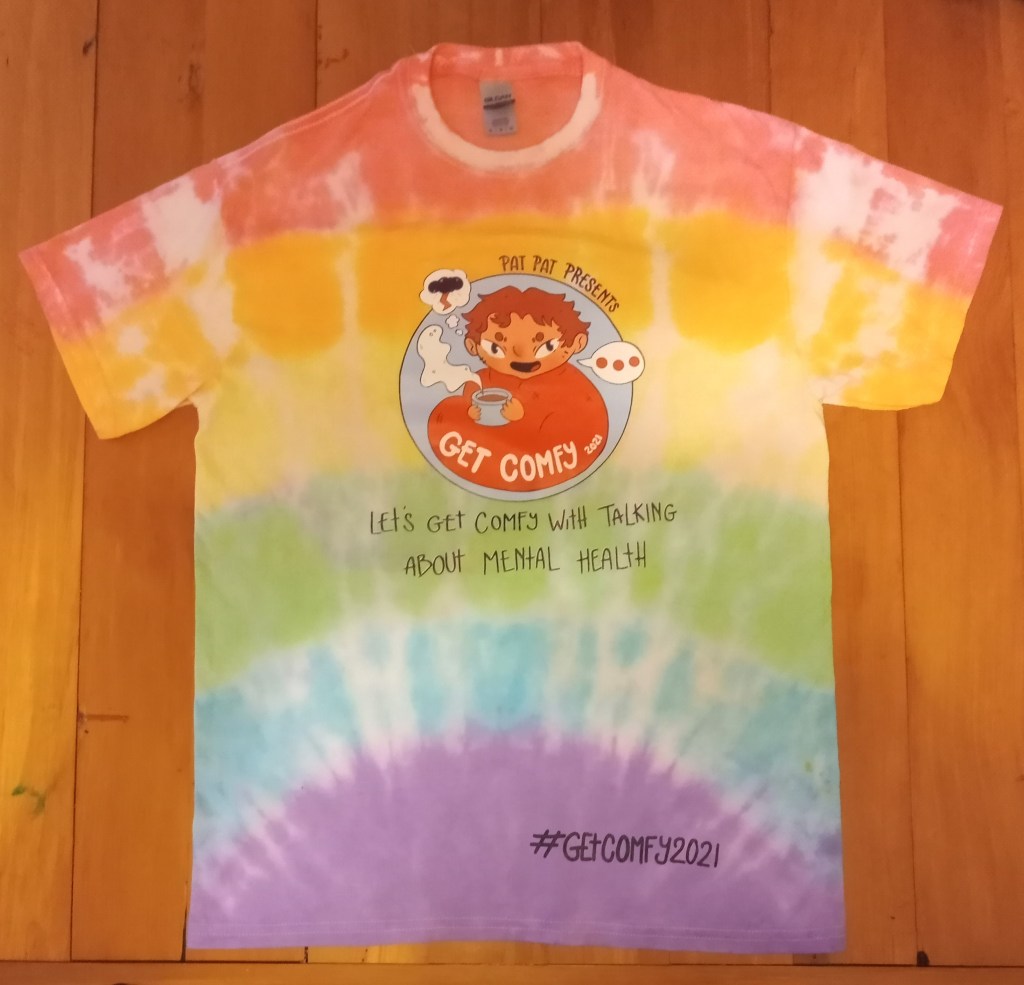
My rainbow tie dye Get Comfy 2021 T-shirtMiss 6’s tie dye technique of her own design
What the kids can do:
While I did most of the folding, twisting and scrunching, Miss 6 did one of her shirts according to her own design. She also did some of the dying, but lost interest half way through. She found the 24 hour wait pretty frustrating, but was really proud at the end that she had tie dyed her own T-shirts. She wore one each day for the whole following week.
We did most of the dying during Mr 21 months’ midday nap, so he did not hep with the dying. The probably prevented a bunch of mess. We did make him some tie dye T-shirts to wear though.
I was a bit disappointed that some colours did not take very well, in particular the pink and the yellow. Perhaps we should have used a more premium kit (e.g a Tulip one) to achieve better results. But overall we had a lot of fun doing this activity and are enjoying modelling our new tie dye T-shirts.
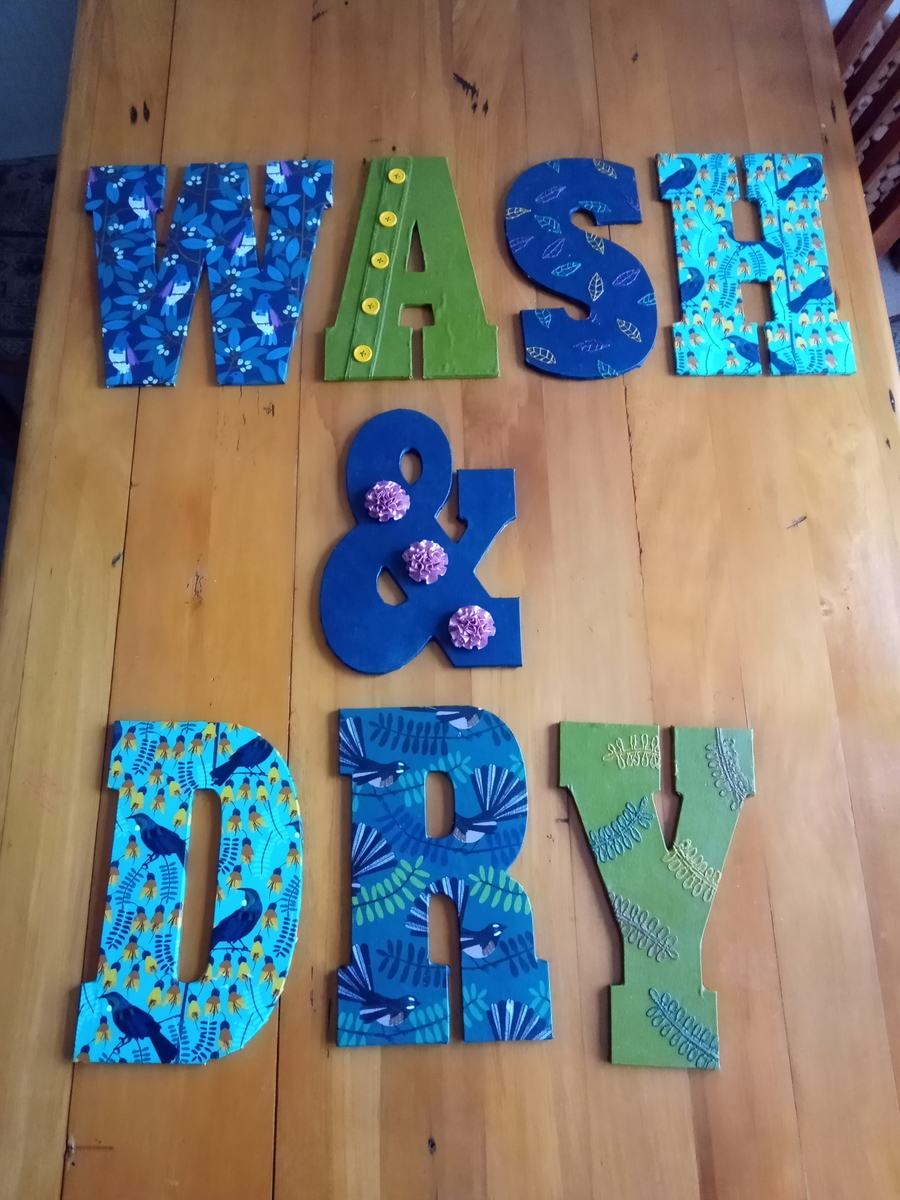
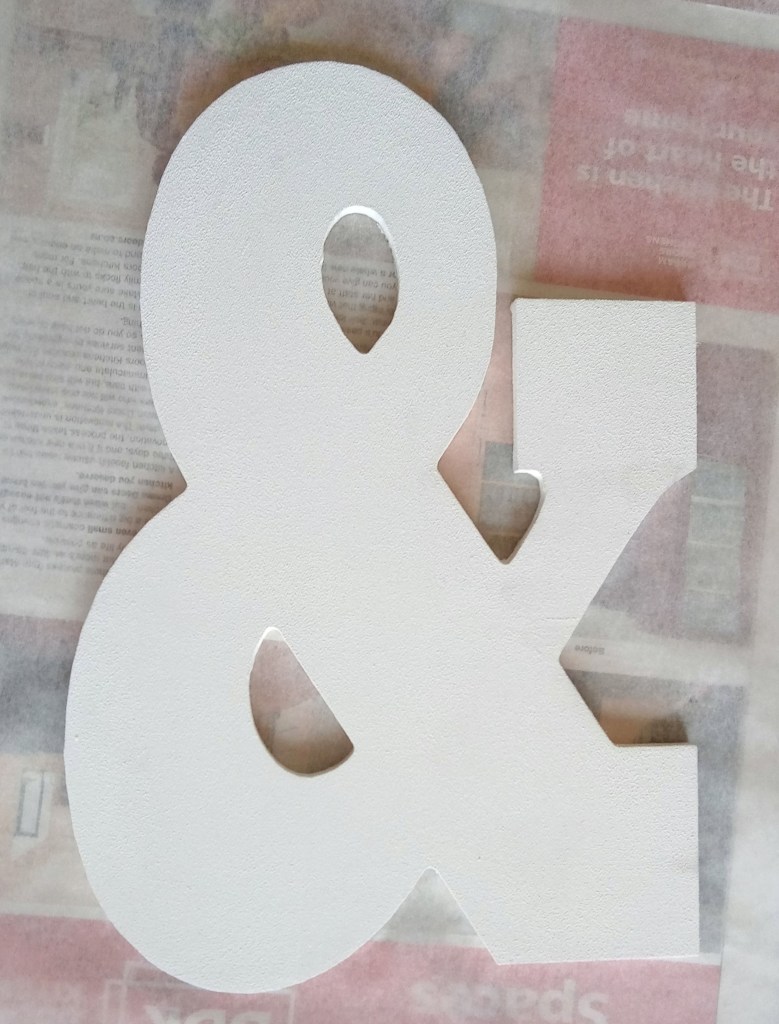
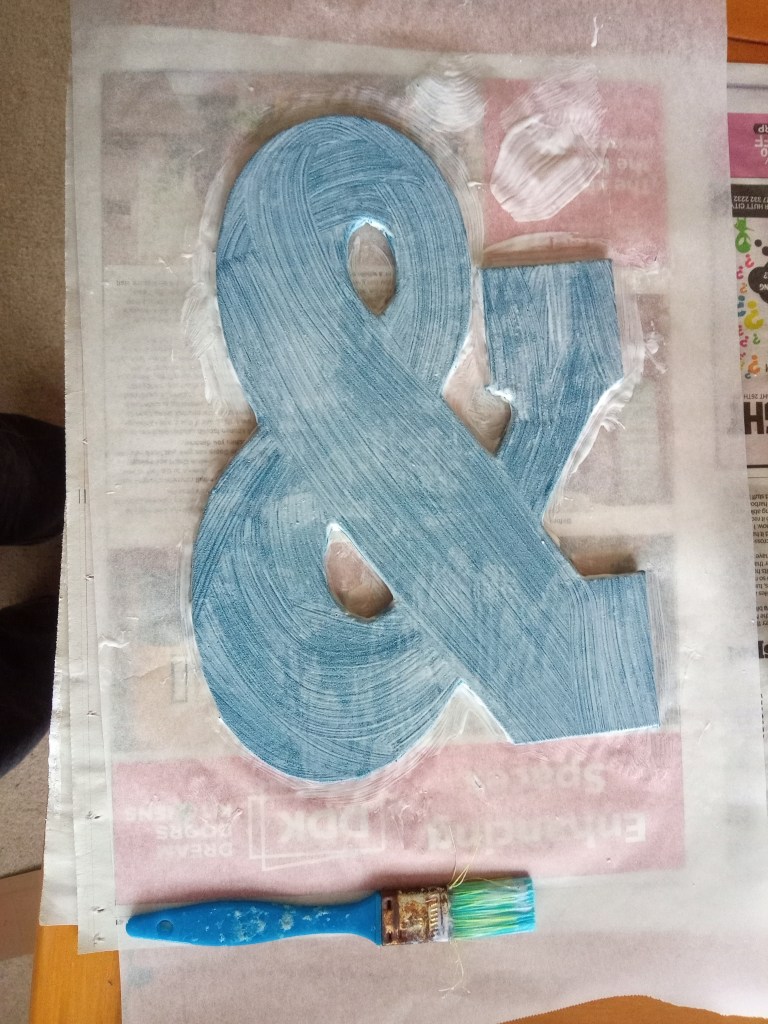
I wanted to make something for our not yet fully renovated laundry. I bought some 30cm MDF letters reading “WASH & DRY” and we decided to cover it with fabric. I found some fabric at Spotlight with some NZ native birds (kererū, tūī and pīwakawaka) in the pattern, in colours that will go with our “new” laundry cabinets.
Things you will need:
A large MDF letter of your choice (If you live in NZ you can get the custom made from My backyard creations on Trade me for a very reasonable price)
White acrylic paint
Fabric to cover letters
Mod podge
Baking paper.
Instructions:
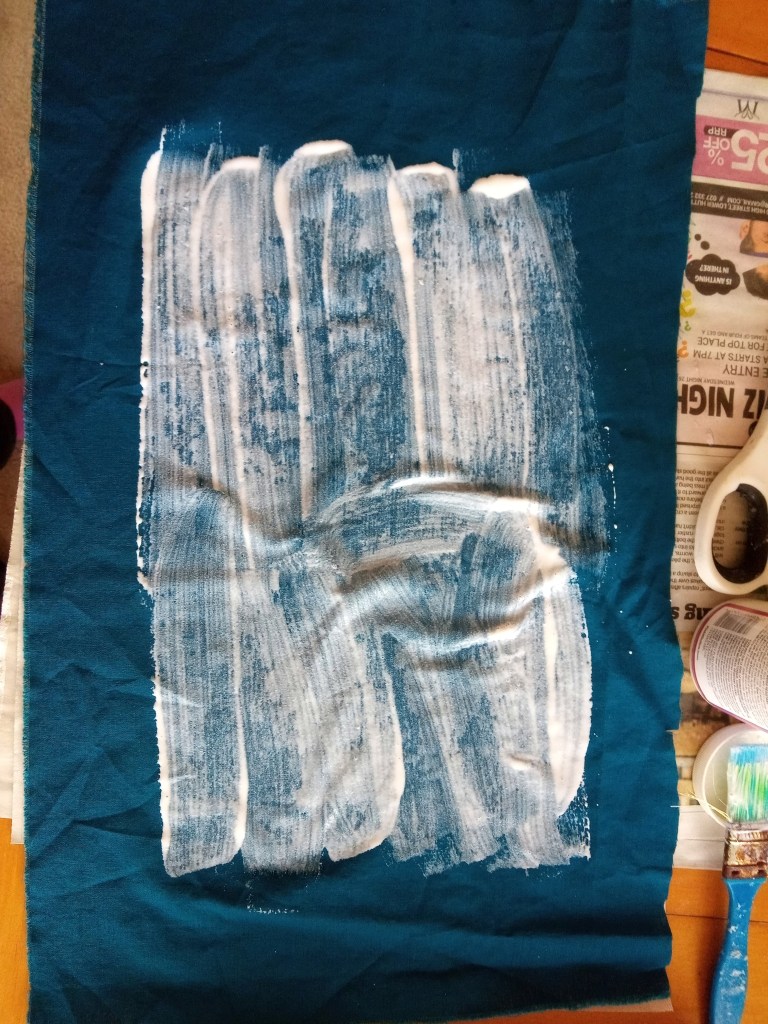
Take the baking paper and cover your work surface with it. This will stop your letter sticking to it with the paint (I didn’t do this and got newspaper stuck to the back of mine) and the mod podge (learned my lesson by this time).
Paint your letters with two coats of white acrylic paint. It is important to paint with a light colour, as dark colours can show through the fabric. Allow paint to dry.
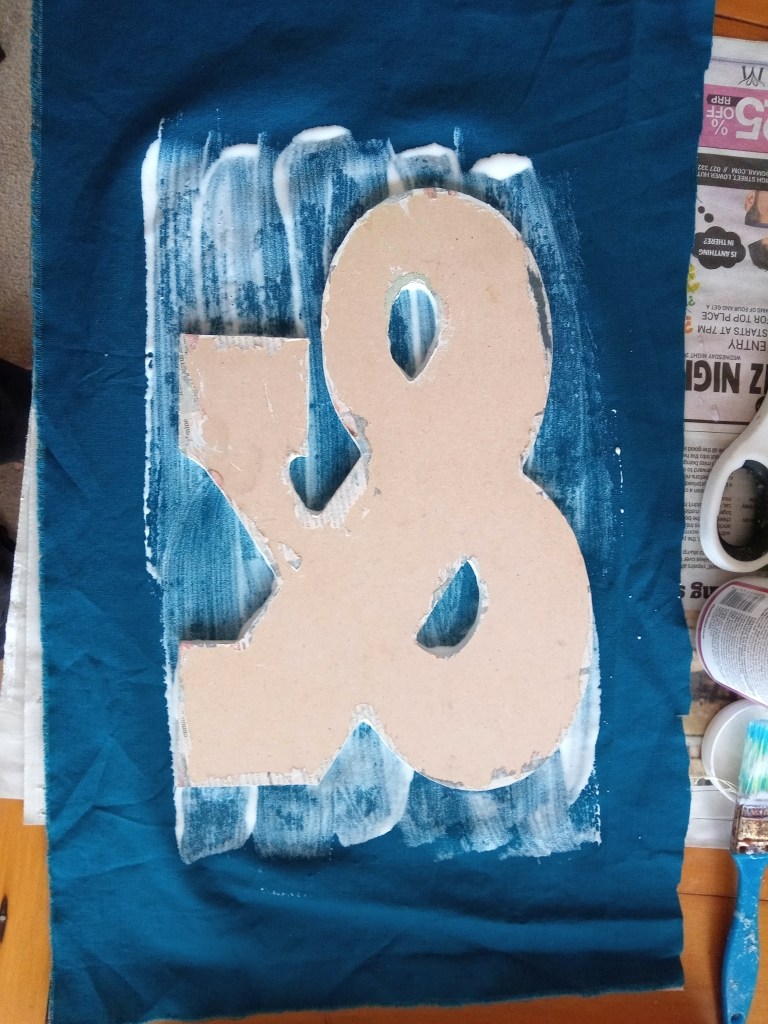
Choose the fabric you want to cover your letters with. I embroidered some of the motifs from the patterned fabrics onto some of the plain fabric to pull them all together. I also sewed some buttons on some other fabric. Cut out out a piece of fabric at least an 5cm larger on all sides than your letter. Paint both the letter and the back of the fabric with mod podge.
Smooth the fabric onto the letter and make sure there are no bubbles in between (I missed some on the A).
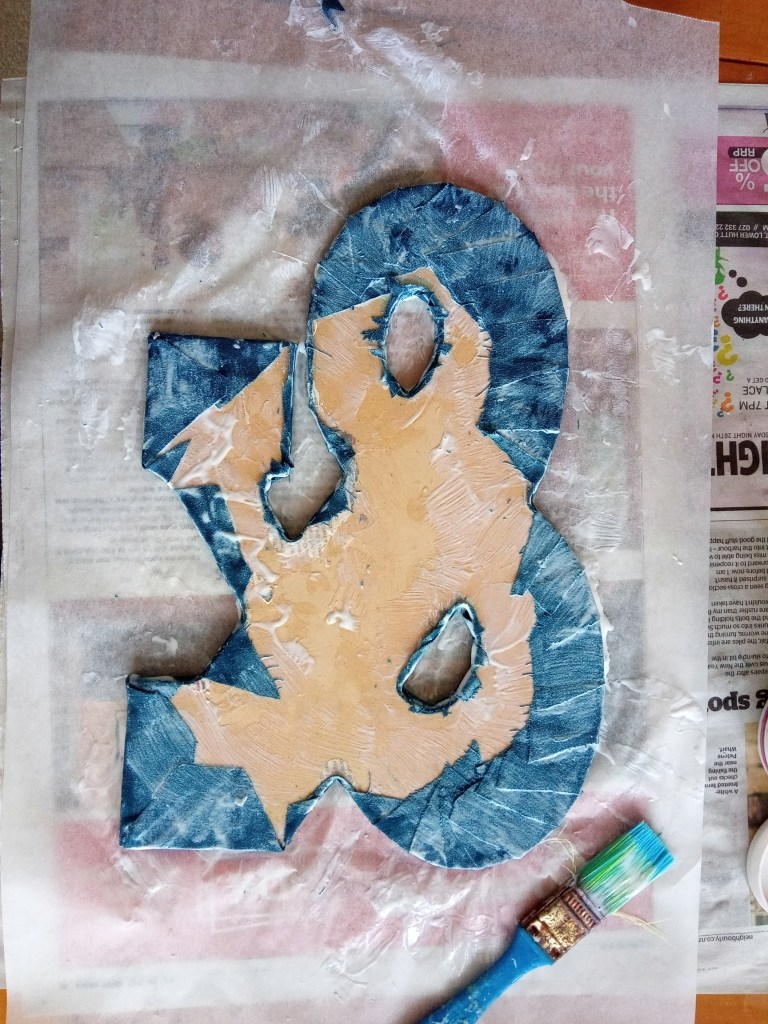
Trim the fabric around the letter and make cuts every 3-5 cms around the edges. Also cut strips of fabric the width of the MDF letter. With mod podge stick these anywhere there is an inside corner, otherwise the white paint will show through the gaps.
With mod podge stick all the edges of fabric as smoothly as possible around the edge of the letters and to the back.
Turn the letter over. With a paint brush (gives a streaky effect) or with a sponge (gives a mottled effect) cover the surface of the fabric letter with mod podge. Allow mod podge to dry and leave to cure for 4 days.
What the kids can do:
Miss 6 helped to paint the letters white. She also helped me with putting the fabric on the first letter, but lost interest after that. So this one turned out to be more of a Mummy project than a family one.
Professor Lester is investigating the infection of monarch butterflies with the OE parasite (Ophryocystis elektroscirrha) which, in adult butterflies, can cause crumpled and deformed wings. Currently the rates of this infection in New Zealand monarch butterflies are not known. Our samples will help answer this question.
Things you will need:
Swan plants to attract monarch butterflies Clear sellotape/scotch Paper and pen
Instructions:
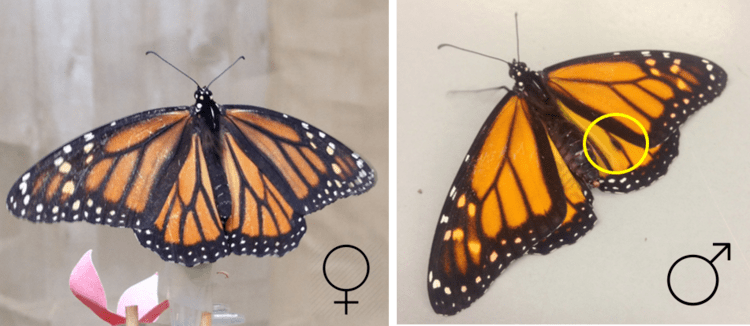
Before you pick up the monarch butterfly determine the sex of the butterfly. This can be done by looking at the wings. Male monarchs have scent spots on their hind wings as shown by the picture below from the butterfly biology blog. Follow the link if you want to know more about telling male and female butterflies apart.
Female (♀) monarch butterfly (left) and male (♂) butterfly (right), the male scent spot is circled in yellow.
Professor Lester recommends following the method shown in the video below to safely catch a monarch butterfly:
Touch the sticky side of a piece of clear tape to the butterflies abdomen. This will harmlessly collect a small number of the butterflies scales. You will be able to see a few black specks remain on the tape.
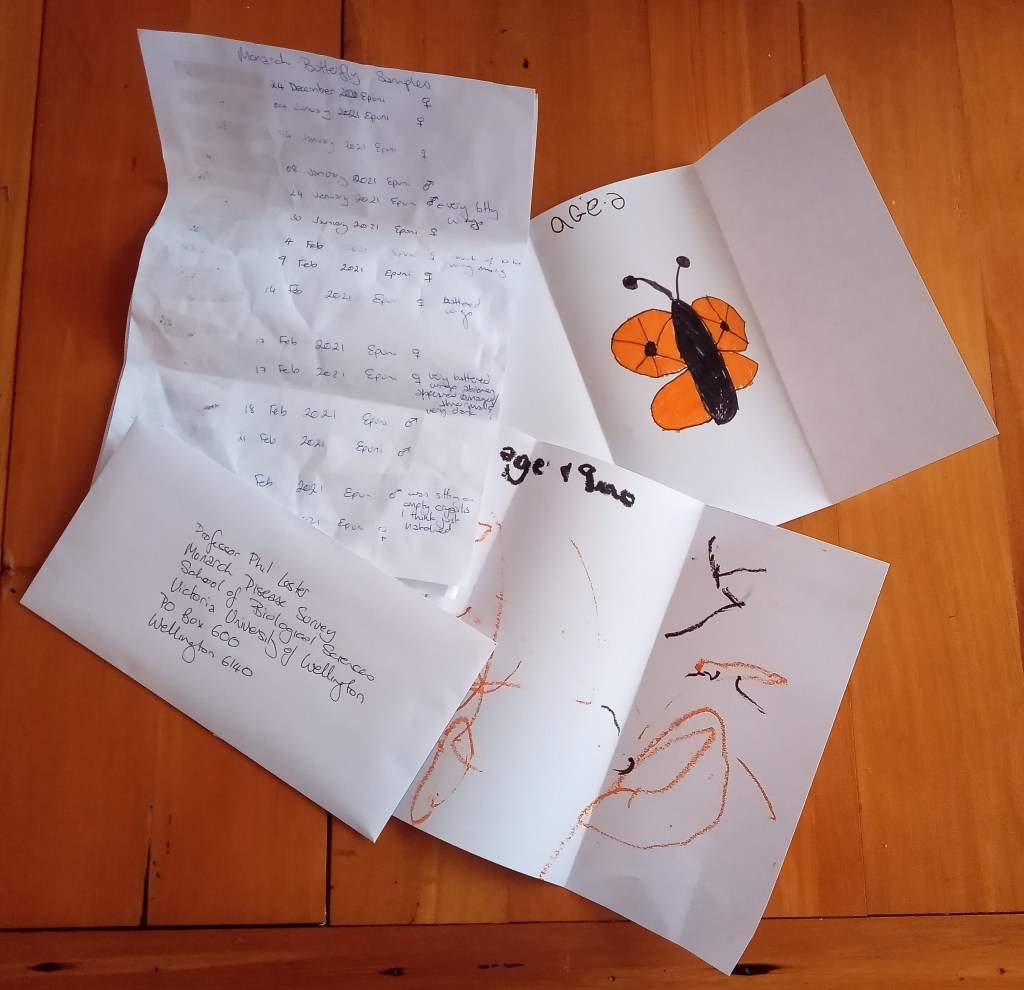
The piece of tape can then be stuck to a piece of paper. Then write the date, sex of the butterfly and the location where you collected the sample next to it.
Once you have collected all your samples they can be sent to Professor Lester.
What the kids can do:
Miss 6 helped keep an eye out for butterflies sitting on our swan plants. At the start of the season she was squeamish about touching them. But by the end she was asking to hold them while I took the scale sample.
Both kids drew a butterfly picture to send along with the samples. Well Mr 19 months’ picture was more of a bunch of squiggles, but Miss 6 drew a “boy” monarch, you can tell because she put spots on his wings.
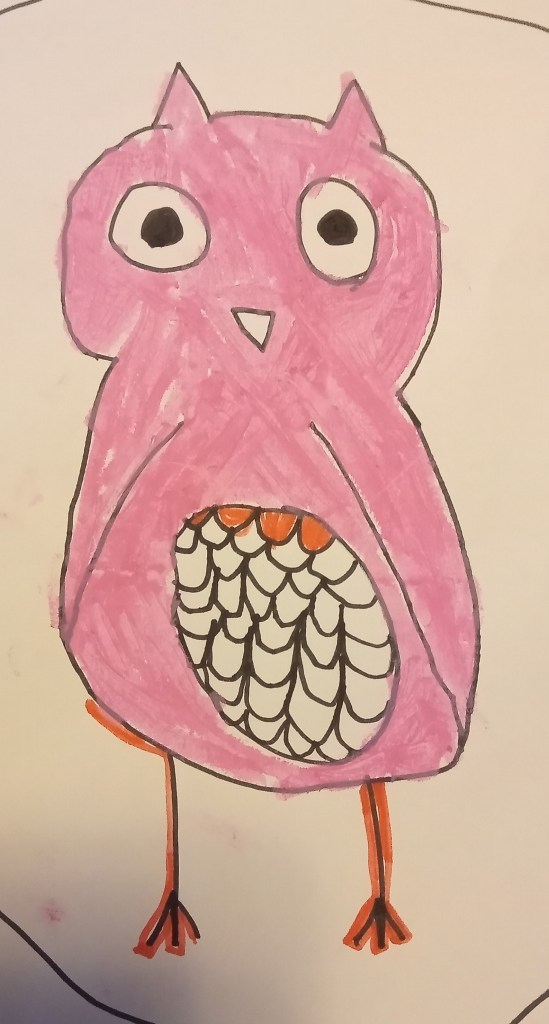
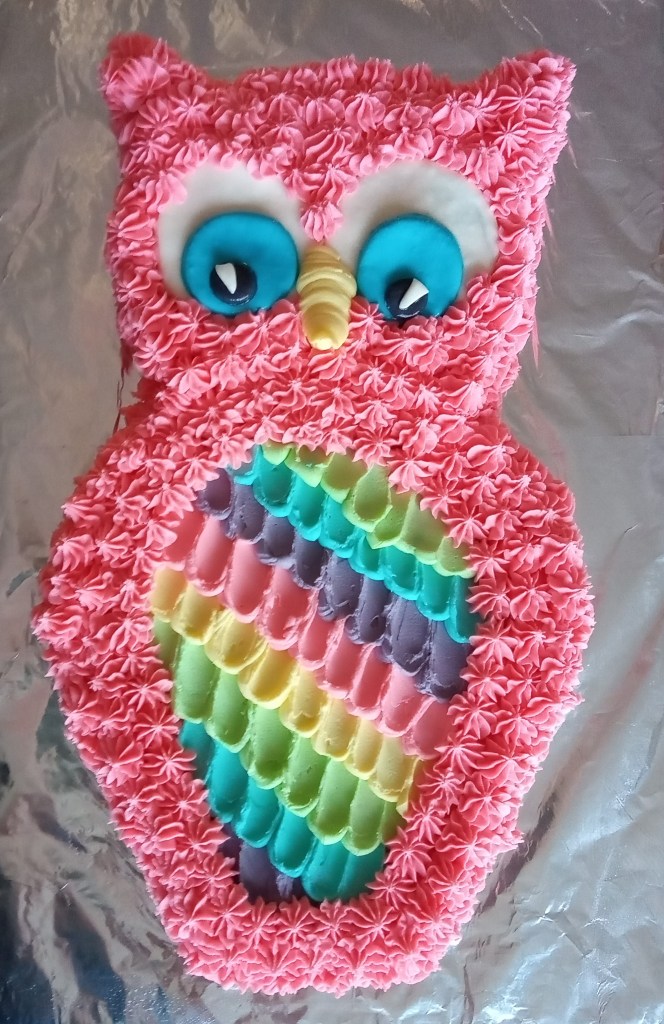
This year, Miss just turned 6 requested an owl themed birthday party, along with an owl themed birthday cake. Miss 6 picked the owl cake design out on Pinterest. She also drew me a picture to go by (see below). We made an extra large banana cake based on the Edmond’s recipe, covered it with buttercream icing (also based on the Edmond’s recipe) and marshmallow fondant eyes.
Ingredients:
Banana cake:
250 g butter, softened 1 1/2 cups white sugar 4 free-range eggs 5 large bananas mashed 1/4 cup milk 2 teaspoons baking soda 4 cups self raising flour
Buttercream icing (make two batches as below):
225 g butter, softened 4 cups icing sugar 1 teaspoon vanilla essence food colouring (red, blue and yellow) water
Marshmallow fondant:
a handful of white marshmallows icing sugar food colouring (blue and black)
Additional items:
sheet of cardboard larger than the planned cake tin foil clear tape 1/4 cup apricot jam 1/4 cup boiling water piping bags star piping tip
Instructions:
Banana cake:
Preheat oven to 180°C (356°F).
Cream butter and sugar together until light and fluffy. Add free-range eggs one at a time, and beat in. Add in mashed banana and combine.
Sift flour into a large bowl, and make a well in the centre.
Boil milk in the microwave and immediately add the baking soda. Stir to froth up.
Pour frothy milk and other wet ingredients into the centre of the dry ingredients and fold together. Pour into a large rectangle cake tin (we used an oven roasting tray) lined with baking paper.
Bake at 180°C (356°F) for about 50 minutes. Allow cake to cool. Cut out a shape resembling Slick Slime Sam.
Cover the sheet of cardboard with tin foil and secure this in place underneath with clear tape. Transfer the cake onto the centre of this base.
Combine 1/4 cup of apricot jam and 1/4 cup of boiling water. Using a pastry brush, brush the cake, especially the cut edges with the mixture. This will reduce the cake crumbling as you apply the icing.
Buttercream icing owl belly:
Combine butter and icing sugar and vanilla essence in food processor and beat until combined. Add food colouring and mix until you achieve the desired colour. You can add a little water (or milk) to achieve the desired consistency.
Apply a thin base covering of pink icing to the cake and smooth over the sides and top until cake is evenly covered. It does not have to be perfect at this stage. Place the cake in the fridge to harden the layer of icing. Make rainbow coloured icing for the owls belly. Using a butter knife, draw an oval on the owls belly and draw on a series of evenly spaced diagonal lines. Make rainbow coloured icing for the owls belly. Place each colour in a separate piping bag and cut a relatively large hole in each corner. Working from the bottom, pipe a line of dots your first icing colour along the lowest diagonal line. Using a butter knife spread the dots of icing towards the owls head. Repeat with the next colour, placing icing dots between the lines from the first colour. Repeat until the owls belly is covered.
Marshmallow fondant:
Place the handful of white marshmallows in a bowl and microwave until they puff up. Take them out of the microwave, and mix to combine melted marshmallows. Gradually add icing sugar until mixture comes together enough to kneed. Split into 3 batches and add food colouring to achieve the desired colour. ‘Flour’ a board with icing sugar and kneed fondant until it reaches a good consistency to roll out. Roll our fondant and cut circles with various sized round cookie cutters.
Place marshmallow fondant eyes on the cake.
Buttercream icing:
Make another batch of buttercream icing by combining butter and icing sugar and vanilla essence in food processor and beat until combined. Add food colouring and mix until you achieve the desired colour. You can add a little water (or milk) to achieve the desired consistency. Place butter cream into a piping back with a star piping nozzle. Cover the remainder of the cake with pink piped stars. As the pièce de résistance use the left over yellow icing from the belly to pipe an owl beak.
What the kids can do:
Hand washing: Don’t forget to get the kids (and grownups too of course) to wash their hands before you start. Little hands always seem to end up touching everything, including the ingredients. This is extra important given the current Covid-19 situation. For good 20 second hand wash, have them sing “happy birthday to me” twice.
Eggs: Pro tip for breaking eggs with a 5 year old, break eggs into a separate glass bowl before adding to your other ingredients. That way you can see and pick out any bits of shell before they are added in by mistake. I like to use free range eggs, because it is kinder to the chickens, and they also taste better. Bear in mind that raw eggs can carry Salmonella so wash little hands if they end up the raw egg. I also don’t recommend eating raw cake batter, just in case.
Mixing the ingredients: My daughter likes to help using the food processor to mix all the ingredients. Bear in mind that little hands can fit down the shoot of the food processor, so always supervise this step. The biggest messes seen to happen when sifting and mixing dry ingredients with the kids. A great tip from reader Dana M is to put a towel down underneath, which catches any stray ingredients for easy cleaning. When folding wet into dry ingredients, you want to mix thoroughly, but not too much or the cake will go flat. This usually requires the grown up to either finish off the mixing and/or intervene before things are mixed too much.
Icing the cake: It is quite hard for little ones to help getting the icing on the cake, but Miss 6 is more interested in licking the spoon anyway.
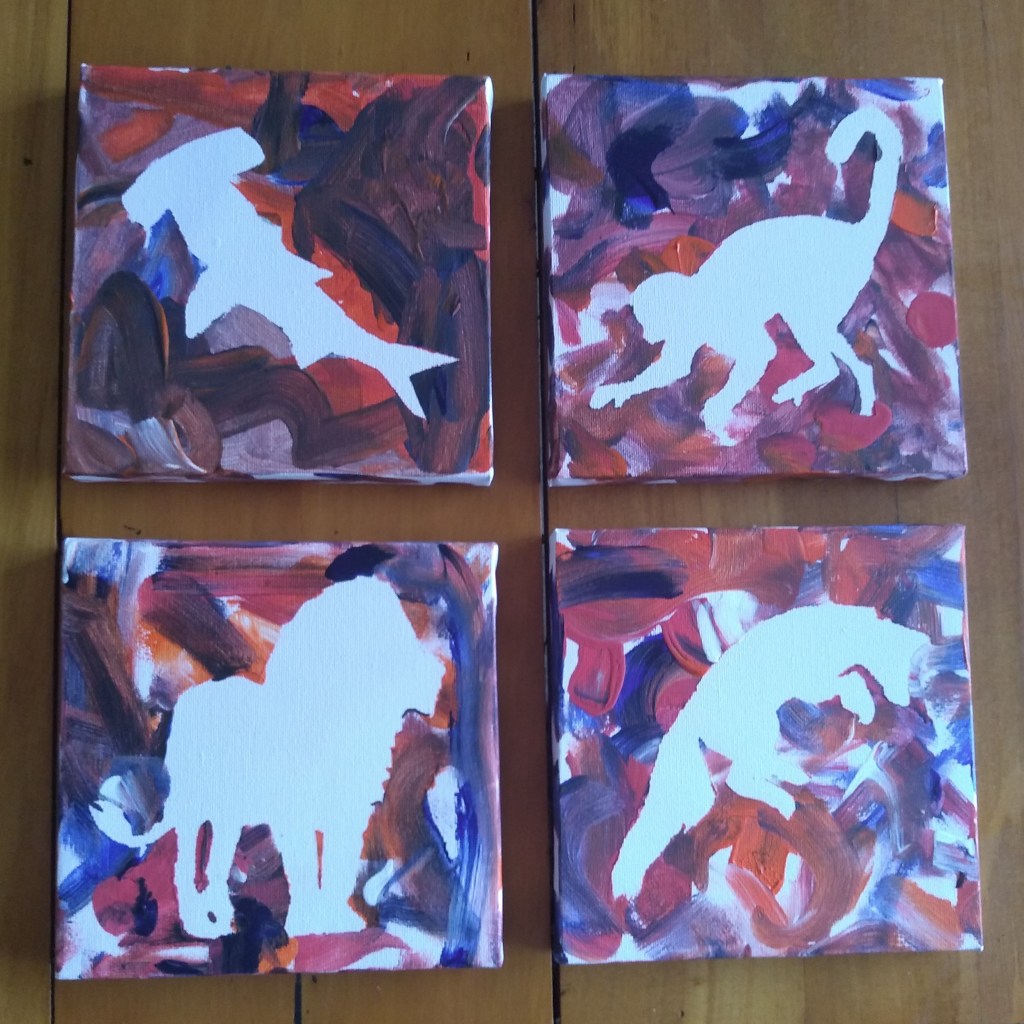
Mr 16 months will be moving into his own room shortly so we thought we should make some art for his walls.
Things you will need:
Masking tape Printouts of silhouettes of your favourite animals 4x 15cm square canvasses Acrylic paints in your favourite colours Paint brushes
Instructions:
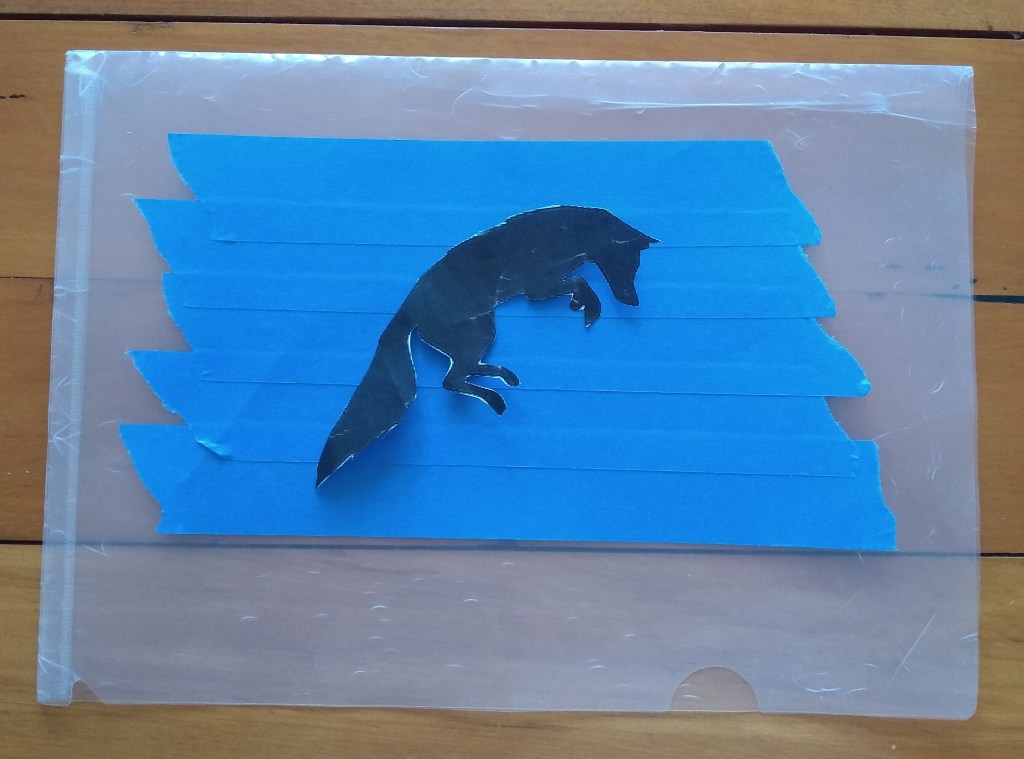
On a flat surface, take strips of masking tape and overlap them until it is wide enough to contain your animal silhouette. I just found these from a google image search, sized them appropriately and printed the out. Cut out your animal silhouettes and arrange them on the masking tape sheet with a piece of masking tape looped sticky side out underneath. Draw around the silhouette.
Carefully remove the masking tape from the surface, making sure it stays in one big piece. Cut out your animal silhouette being careful not to let the masking tape stick to itself. Place the masking tape animal silhouette on the canvas and make sure the edges are stuck down as well as possible.
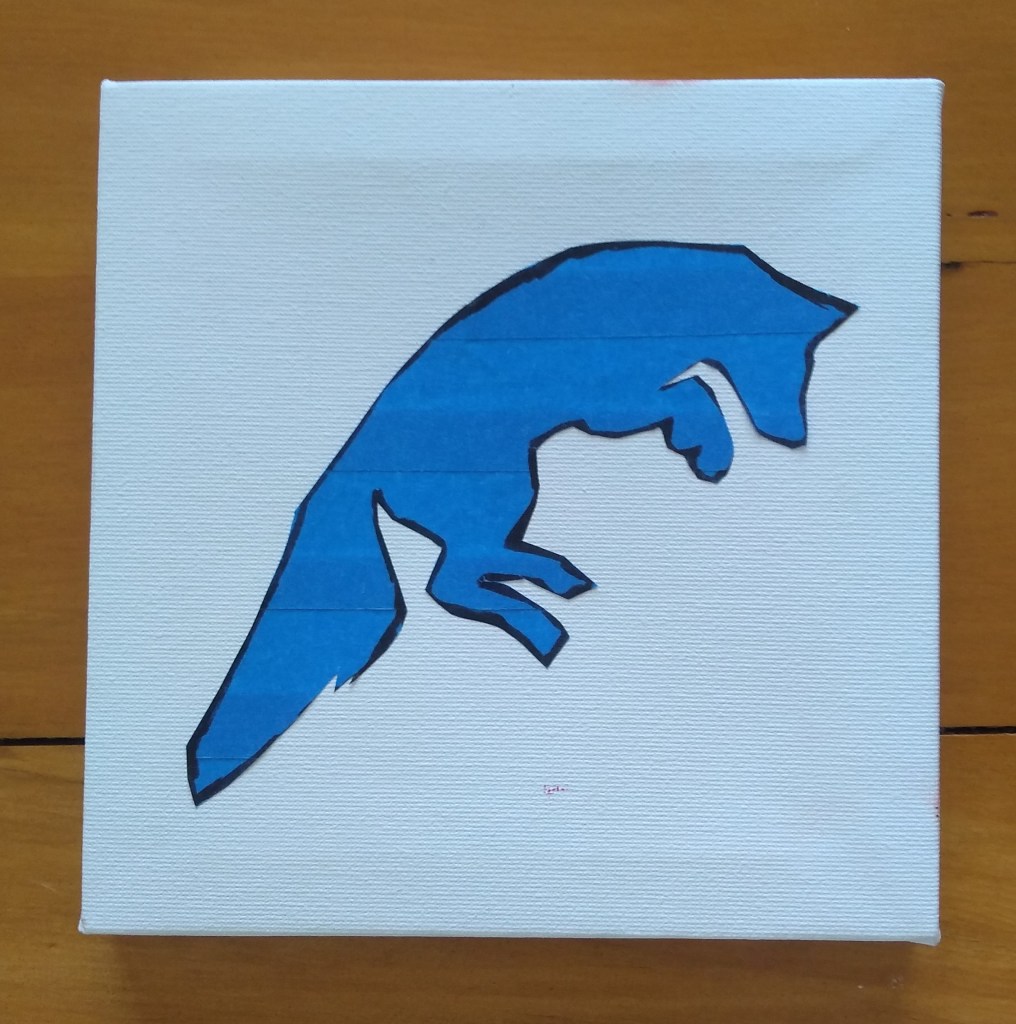
Taking your favourite colours of acrylic paint, apply these to your canvas any which way you like. If you can, it is better to paint in the direction of from the masking tape to the canvas, rather than the other way around, to prevent lifting up the edges of the masking tape.
Allow the paint to partially dry before carefully removing the masking tape, and et voila you have your animal silhouette. Dry completely before hanging on your wall.
What the kids can do:
I arranged the masking tape and cut out the silhouette. Miss 5 drew around it. I cut out the silhouette in masking tape. This can be a bit tricky as the making tape likes to stick to itself. I then stuck it to the canvass. Mr 16 months started off the painting, and Miss 5 and I finished it off when he lost interest in painting and started trying to put the paint in his mouth. A bit later, when the paint had dried, I took the masking tape off the canvass, careful not to mess up the paint.
Miss 5 now wants to make a Unicorn silhouette painting for her room. I image I will be posting on this in the near future.
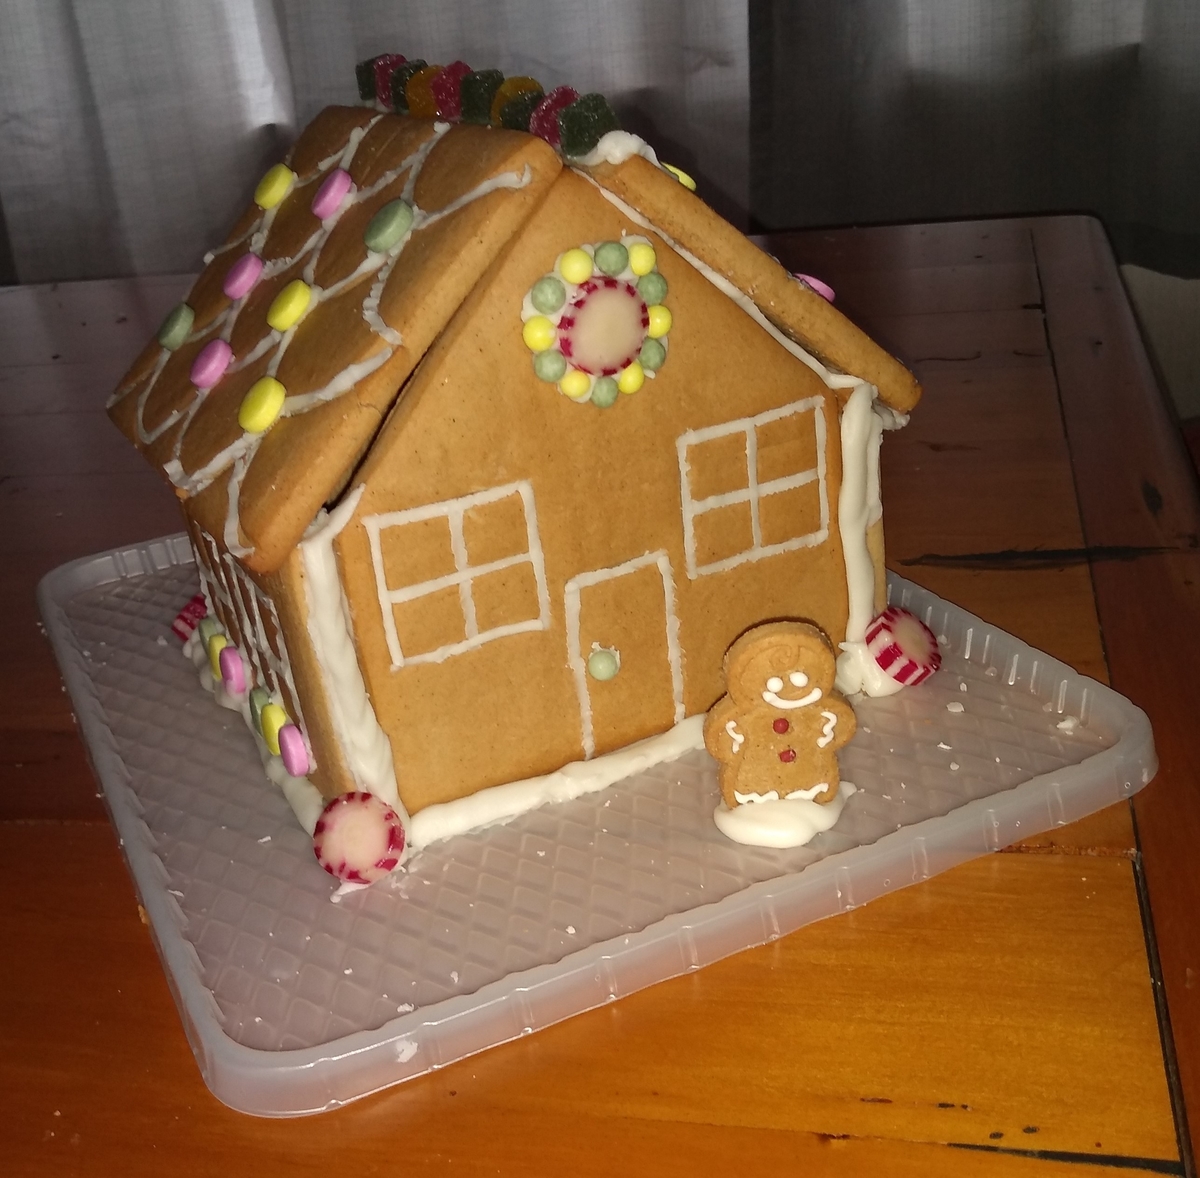
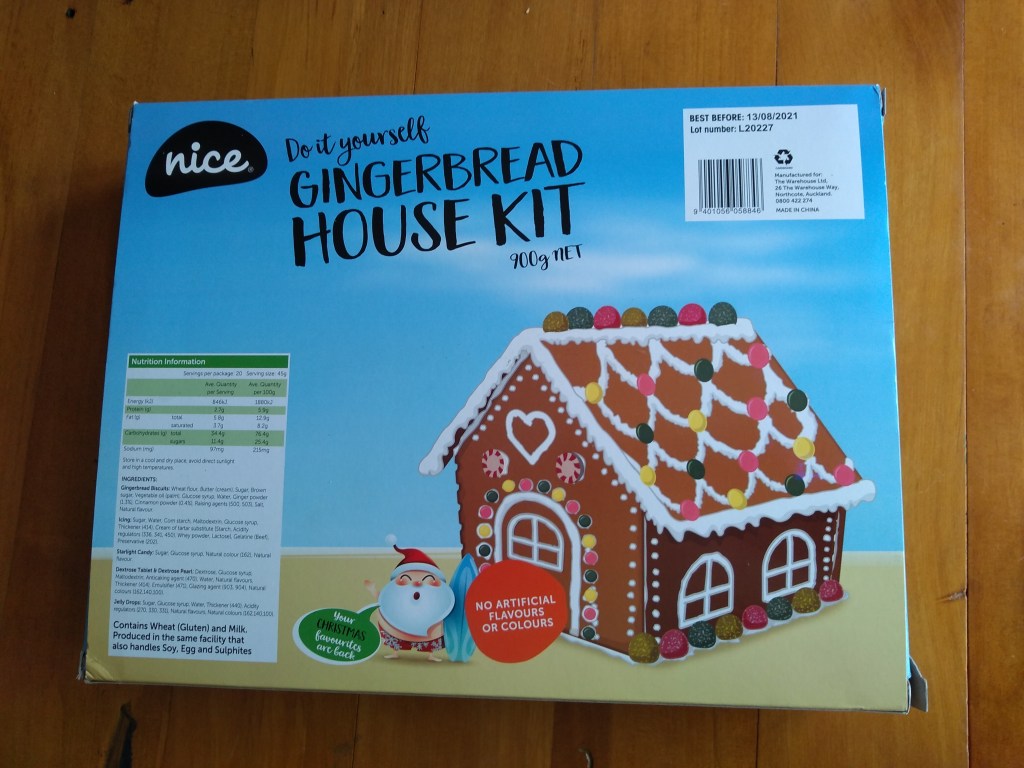
Miss 5 attended a birthday party a few weeks ago. She won the pass the parcel and the prize inside was a gingerbread house kit. So we put it together before christmas (though I am posting it after).
Things you will need:
1 ‘Nice’ do it yourself gingerbread house kit (see below)
It contains the gingerbread walls and roof, icing and assorted lollies. We added a little gingerbread person which was about right size.
Instructions:
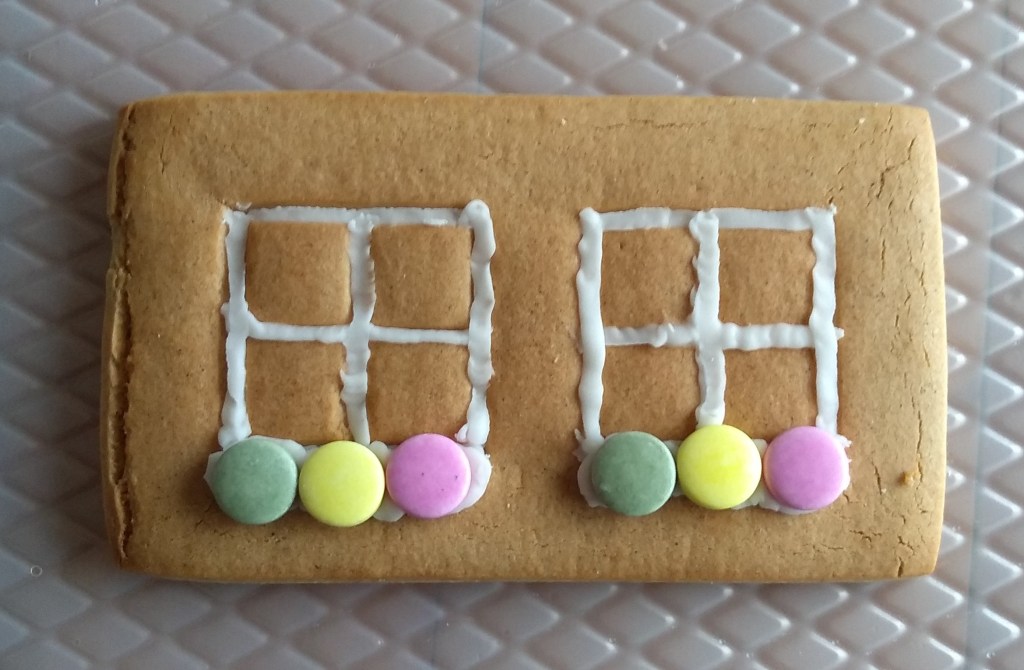
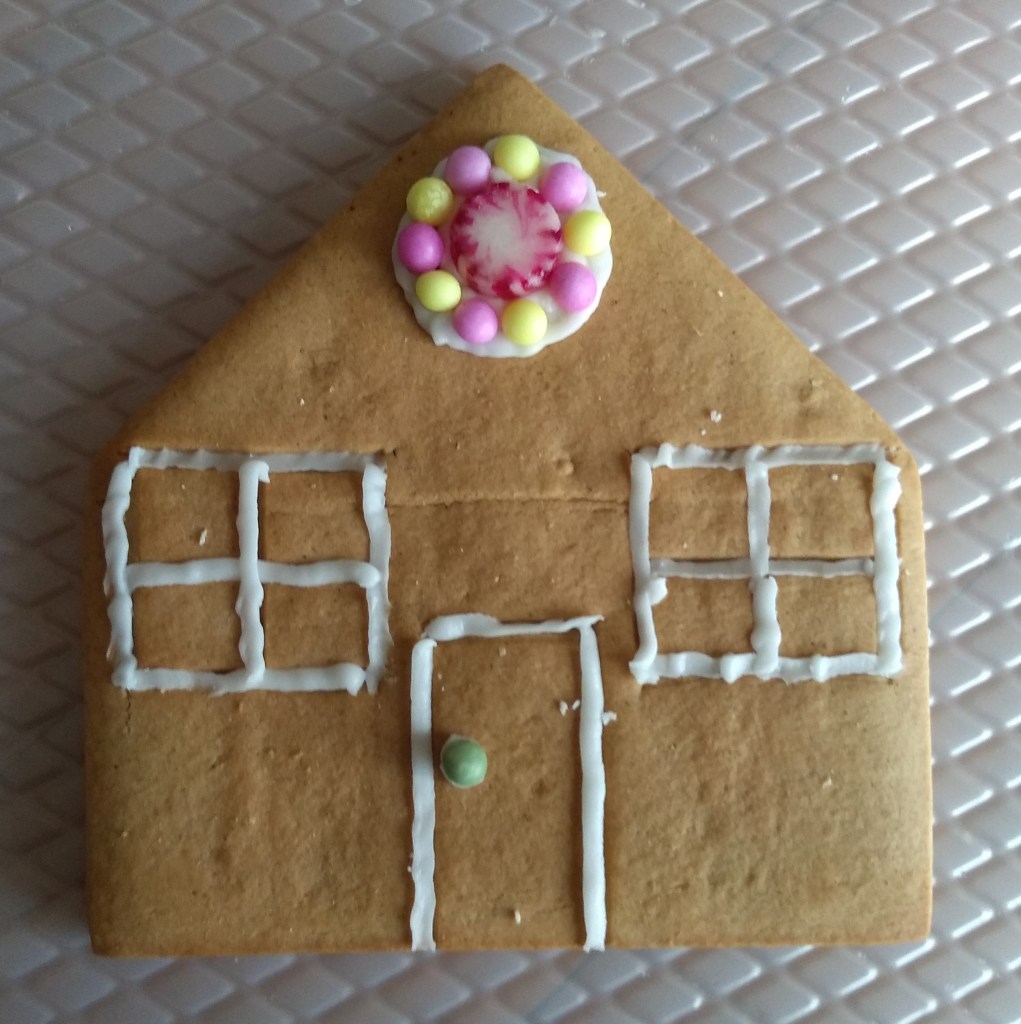
Following the instructions in the kit, cut a small hole in the corner of the bag of icing and draw on the windows, doors and roof tiles. To apply larger amounts of icing, cut a larger hole. Apply a blob of icing to stick lollies onto.
Use icing to glue the house together.
What the kids can do:
Unfortunately icing was rather thick and required quite a bit of force to pipe. This was definitely a job for a grown up. Miss 5 picked where to put the lollies. I assembled the house, and Miss 5 told me where to put the gingerbread person. We both ate some of it. while the gingerbread house looked good, it did taste a bit bland. Next year we might make one from scratch.
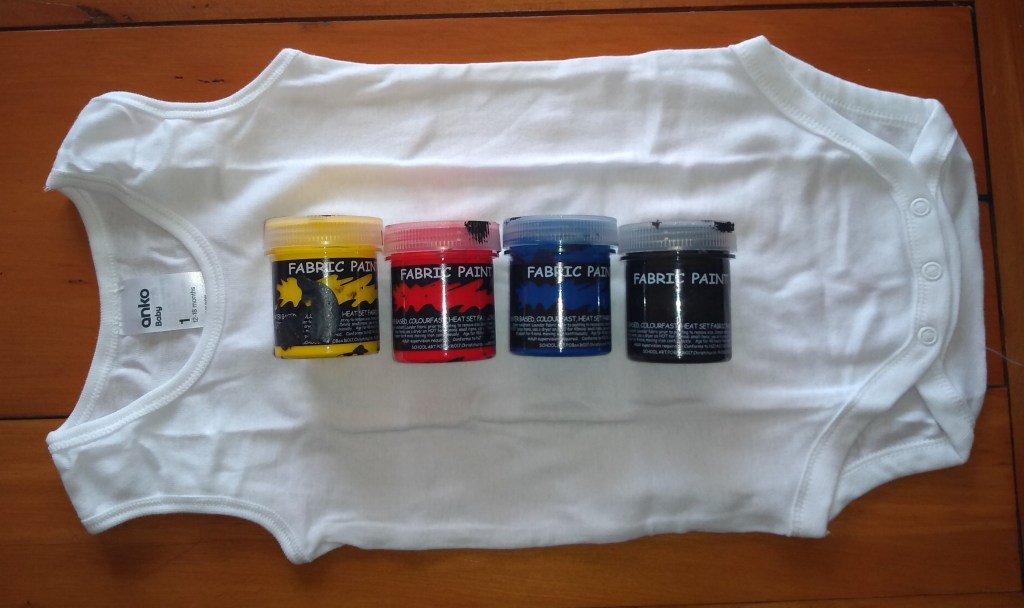
We are doing a bunch of home made Christmas gifts this year. I thought it might be nice for Miss 5 to make something special for Mr 1. I bought a pack of plain white onesies, and we got out some fabric paint…
Things you will need:
Plain white onesies or T shirts for bigger kids. Cardboard Permanent marker Fabric paint – red, yellow, blue, black and white will let you mix most colours. Paint brushes
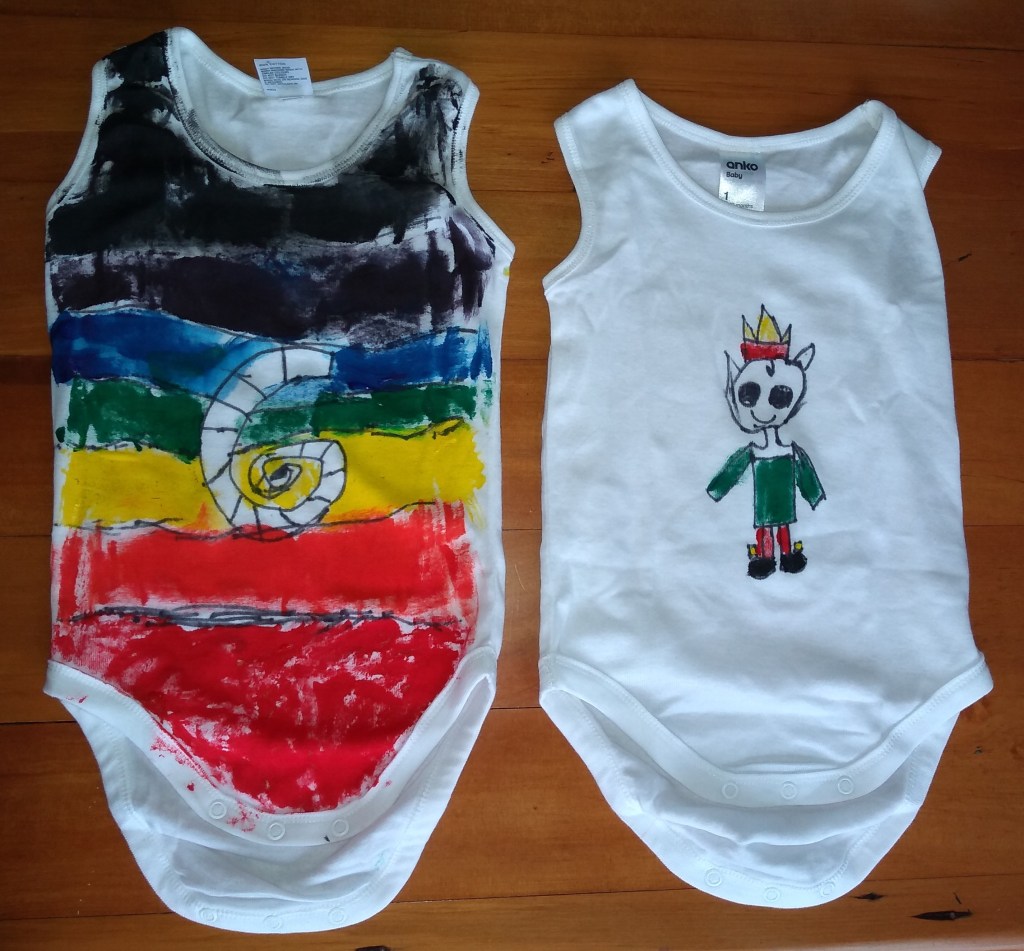
Instructions:
Cut a piece of cardboard to put inside the garment to make sure paint does not leak through to the other side. If the fabric is stretchy, cut it a bit larger than the garment as this will make it easier to paint it.
Kids can then draw on a picture of their choice in a permanent marker, and once complete colour it in with paint. Mixing paints to make different colours will add in an educational colour mixing lesson.
What the kids can do:
All I did was purchase the onesies and cut the cardboard for the inside. All the creative bits were left up to Miss 5, who drew a Christmas elf on one onesie, and a spiral and rainbow stripes on the other. Once dry we will wrap it and put it under the tree for Mr 1.